Here is a step-by-step guide on how to install WAS CLAAS Lexion 700 Single Steering Cylinder Models.More repair manual please refer to:CLAAS Webtic Offline Repair and Service
1. Locate the WAS mounting location on the machine’s steering cylinder.

1
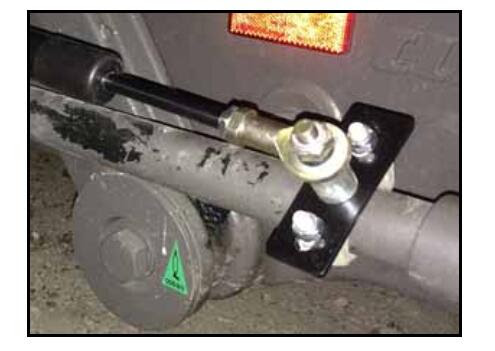
2. Remove the nuts and clamp from the 4-1/2” muffler clamp (P/N 435-3003-070) and install the U-bolt around the right end of the steering cylinder barrel with the U-bolt ends pointing up and angled toward the rear of the machine.
3. Install the clamp on the ends of the U-bolt and secure it using the clamp’s two nuts

4. Insert the M10 x 1.5 pitch x 60 mm bolt (P/N 311-0070-025) through the center hole in the large WAS rod
mounting bracket (P/N 107-0172-431).
5. Install a 0.406” ID x 0.75” OD x 1” spacer (P/N 107-0172-038) on the end of the installed M10 bolt.
6. Install the WAS mounting bracket on the legs of the installed muffler clamp using 3/8” flat washers (P/N
313-2300-014) and 3/8”-16 lock nuts (P/N 312-4001-109).
Note: The bracket should be positioned so that the M10 bolt points away from the clamp.
7. Install the base-end (end with the cable connection) of the WAS on the M10 bolt and spacer, securing it with one M10 lock nut (P/N 312-4000-208)
8. Position the WAS parallel to the tie rod and extend the rod of the WAS to until it is 1” from full compression
or 1” from full extension, depending on whether the rear wheels are turned fully to the left or to the right.
9. Install a muffler clamp (P/N 435-3003-030 or 435-3003-059 as appropriate based on the size of the tie rod) on the tie rod in the location of the M10 ball mount on the rod-end of the WAS.
Note: Position the muffler clamp with the U-bolt ends pointing up and angled toward the rear of the machine.
10. Insert the M10 x 1.5 pitch x 60 mm bolt (P/N 311-0070-025) through the center hole in the small WAS rod mounting bracket (P/N 107-0172-030).
11. Install a 0.406” ID x 0.75” OD x 1” spacer (P/N 107-0172-038) on the end of the installed M10 bolt.
12. Install the WAS mounting bracket on the legs of the installed muffler clamp using 5/16” flat washers (P/N 313-2300-012) and 5/16”-18 lock nuts (P/N 312-4000-059).
Note: The bracket should be positioned so that the M10 bolt points away from the clamp.
13. Install the rod-end of the of the WAS on the M10 bolt and spacer, securing it with one M10 lock nut (P/N 312-4000-208).
14. Tighten all nuts used to install the WAS.
15. Route the cable from the base-end of the WAS toward the left side of the machine’s frame, routing it so that the cable is not near moving parts or heat sources. Secure with plastic cable ties as necessary.


